
I’ve always been a big fan of children’s books, and one of my favorite stories to read to my girls is Eric Carle’s “The Very Hungry Caterpillar.”

(It’s especially a big hit with my very hungry little one, whose love for food developed the day she was born)
So when I recently received a request for a Very Hungry Caterpillar Cake, I was beyond excited and couldn't wait to get started!
Let's begin with the CAKE BOARD!

What you will need...
13 x 19 in rectangular cake board
Gum balls (assorted colors)
Glue gun and glue sticks
Patience (this is a necessesity)
Before you begin, decide on a color pattern for your gumballs, and be careful not to make the same mistake that I did…
MAKE SURE THE COLOR SCHEME
COORDINATES WITH THE CAKE!
When I originally started out with my pattern, I created a rainbow design (I even had a great ROYGBV song going on in my head), but half way through, I realized that the finished cake wasn’t going to look good with all those colors, so I had to pull them all off and start again
(this is where the patients comes in handy).

my BEAUTIFUL rainbow board
(I'll have to remember this for a different cake)
(I'll have to remember this for a different cake)

The better pattern for my HUNGRY CATERPILLAR
Now that your cake board is all jazzed up, you can move on to building
THE CAKE...
What you will need...
2 bunt cakes
(I had already baked vanilla cakes, but in the book the hungry caterpillar eats
CHOCOLATE CAKE, so if you're a stickler for details, I'd go with chocolate)
Cake filling
Serrated knife
Cake Board (not the one you just decorated with gum balls..that one is for later)
START by trimming the bottoms of both bunt cakes to make it flat, and then cut your cakes and piece them together into the caterpillar.
This step is a little more confusing than it looks, so take your time and don’t worry if you make a wrong cut. Once you cover the cake with icing and fondant it will hold everything together to it doesn’t matter if you have a lot of pieces. Think of it as a really fun edible puzzle.


Slightly round out the ends of the caterpillar for the head and the end of the body.
NEXT, you can split and fill your cake, and then crumb coat.

Just when you thought you finished the puzzle you have to put it together all over again.

| Crumb Coat (this just means covering the cake with icing) |
Place the cake in the refrigerator to chill while you dye the fondant.
DYING THE FONDANT (WARNING...you will definitely be needing your patience for this step as well)
The caterpillar in the book varies quite a bit in color.
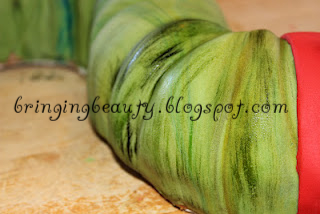
I really wanted to capture that look, so I used a marbalized effect when dying the fondant.
I started by dying the fondant LIGHT GREEN, and then I used a combination of LEAF GREEN, MOSS GREEN, GOLDEN YELLOW, and SKY BLUE icing colors, and I basically spent what seemed like eternity adding more and more color until I reached the look I wanted (or gave up and settled for the color I had).


TADA!!!!
COVERING THE CAKE WITH FONDANT
Now it's time to cover the cake with fondant. Being that the caterpillar has segments, you can cover the cake in sections...

Use a fondant tool to create defined segments

Add a RED segment for the head and your ready to add the FINAL DETAILS
FINAL DETAILS

Cut out the eyes and nose using and x-acto knife

Create the antennas using purple fondant and toothpicks

Add more color variation by painting the fondant with a mixture of a
small amount of vodka and the same icing colors you used to dye the fondant
small amount of vodka and the same icing colors you used to dye the fondant

Add any additional details that you'd like and ENJOY!!!
Please leave your comments below and don't forget to subscribe!
-Dana
(We're linking up with these cool blogs!)


0 comments:
Post a Comment